Sunday, May 31, 2009

Summer Berry Baby Stars with Cream Cheese Dollops EZ

These are SO good and SO quick and SO easy that you'll want to have the frozen pie crust in your freezer and a package of cream cheese in the fridge all summer so you can whip some up at a moments' notice. Very, very easy to make, l♥vely to look at and just as yummy when you pop one in your mouth! Once summer has turned into fall, these are equally delicious with a lemon custard or chocolate mousse filling.

Ingredients
  • 1 (15-ounce) package refrigerated piecrusts
  • 1/3 cup water
  • 1/2 cup sugar
  • 2 tablespoons cornstarch
  • 2 tablespoons butter or margarine
  • 1 pint fresh blackberries, blueberries, raspberries or strawberries
  • 1 (3-ounce) package cream cheese, softened
  • 2 tablespoons butter or margarine, softened
  • 1 teaspoon vanilla extract
  • 1 cup powdered sugar

Unfold piecrusts; press out fold lines with a rolling pin on a lightly floured surface. Cut piecrusts with a 2 1/2-inch star-shaped cutter, and fit into lightly greased miniature muffin pans.

Bake at 350° for 7 minutes or until golden. Remove from pans, and cool on wire racks.

Bring 1/3 cup water and next 4 ingredients to a boil in a heavy saucepan over medium heat. Boil, stirring constantly, 1 minute; remove from heat.

Stir together cream cheese and next 3 ingredients.

Spoon blackberry mixture into tart shells; pipe or dollop with cream cheese mixture. Sprinkle with additional powdered sugar, if desired.

Makes about 20.

Fresh Blueberry Breakfast Muffins with Coconut Topping

Over time you'll probably see quite a few recipes with a little coconut here and a little coconut there. Why? Because I just love the taste, crunch and look of that little addition to my creations when I bake. It makes me think of feathers or ruffles or curly ribbons and those things make me happy and, whatever else, we all need a little happiness in our lives when we least expect it☺ Generally, I will double this recipe because these keep or freeze very well so you can grab one, sit down with a cup of tea and pamper yourself with a little mid-day treat.

Ingredients
  • 1/2 cup (1 stick) unsalted butter, softened
  • 3/4 cup sugar
  • 2 teaspoons freshly grated lime zest
  • 2 large eggs
  • 5 tablespoons heavy cream
  • 1 cup all-purpose flour
  • 1/4 teaspoon salt
  • 1/2 cup plus 3 tablespoons sweetened flaked coconut
  • 1/2 cup blueberries

Preheat oven to 350 degrees F and butter and flour 7 (1/2-cup) muffin cups (just butter if nonstick).

Beat together butter, sugar, and zest until light and fluffy. Beat in eggs, one at a time. Beat in cream, then flour and salt, on low speed until just combined. Stir in 1/2 cup coconut and gently stir in blueberries.

Spoon batter into cups, filling the cups, and smooth tops. Sprinkle tops with remaining 3 tablespoons of coconut.

Bake in middle of oven until a tester comes out clean and edges are golden brown, about 25 minutes. Place onto a rack and cool.

We've got an easy, quick and delicious recipe for Faux Chinese Chicken Soup over at Our family attic...

Thursday, May 28, 2009

♥Easy-peasy Peanut Butter & Jelly Cookie Bars♥ with a little kiss of chocolate


Summer is just around the corner and the kids' will be home looking for snacks during the day or something to wash down a glass of cold milk. These little guys are a great tummy filler that keeps well and travels well, for picnics and family BBQ times. Keep them covered in the fridge to prolong keep chocolate from melting in little hands but I guarantee you, they won't last that long in a hungry mouth! I've made these with about every kind of jam and jelly around. I like the strawberry, but cherry preserves really give them a special touch!

I've gone so far as to cut them and wrap individually in foil. Popped them in the freezer in a zip lock bag...all set for one or two or several little hands to gather up on their own.

Ingredients:

  • 1 pkg. (16.5 oz.) purchased chocolate chip cookie dough, divided
  • 3 tablespoons peanut butter, plain or chunky
  • 1/4 cup strawberry or grape jam
  • 1 tablespoon all-purpose flour

Directions:

PREHEAT oven to 325° F. Grease bottom of an 8-inch-square baking pan.

PLACE 14 pieces of dough in prepared pan. Allow to soften for 5 to 10 minutes. Using fingertips, pat dough gently to cover bottom. Spread with peanut butter and jelly. Crumble remaining dough in small bowl. Add flour; mix thoroughly. Sprinkle dough mixture evenly over jelly.

BAKE for 24 to 28 minutes or remove until golden brown. Cool completely in pan on wire rack. Cut into bars.

Tuesday, May 26, 2009

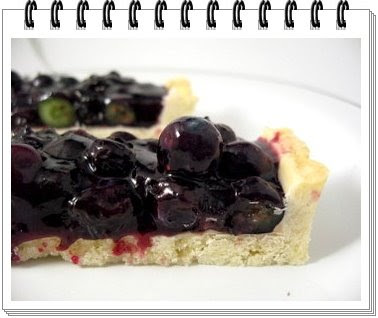
Blueberry Tart with White Chocolate Lining

Fresh Blueberry Tart
with White Chocolate Lining

Crust
6 tbsp butter, room temperature
1/4 cup sugar
1 large egg
1 1/3 cups all purpose flour
1/4 tsp salt
3-oz. white chocolate

Filling
3 cups fresh blueberries, divided
3/4 cup sugar
2 tbsp cornstarch
2 tbsp water

Make the crust: In a large bowl, cream together butter and sugar. Beat in egg. When fully incorporated, stir in flour and salt until dough comes together. Press dough into a disc, wrap in plastic wrap and refrigerate for 1 hour. Preheat the oven to 350F.


Roll chilled dough out on a lightly floured surface until it is large enough to cover a 9 or 10-inch round pie tin (or a 4×14-inch rectangular tart pan). If the dough cracks around the edges, you can patch it with an extra piece of dough. Press into pan and up the sides. Poke bottom crust a dozen times with a fork. Bake for 20-25 minutes, until edges just begin to turn golden. Cool completely.


When crust has cooled, melt white chocolate in a small bowl and use a small offset spatula or pastry brush to brush an even layer of chocolate on the inside base and sides of the crust. Chill until ready to use.

Make the filling: Combine 1 1/2 cups of the fresh blueberries with 3/4 cup sugar in a medium sauce pan. Whisk together water and cornstarch in a small bowl and stir into blueberry mixture. Cook, over medium-high heat, until berry mixture comes to a simmer and begins to thicken. Stirring occasionally, boil for about 1 minute. Transfer berry mixture to a large bowl to cool to room temperature.


When berry mixture has cooled, stir in fresh blueberries. Pour blueberry mixture into prepared crust and spread into an even layer. Refrigerate (up to 2 days) until ready to serve.

Sunday, May 24, 2009

Dear God, bring to rest our fallen warriors & watch over those we have in harms' way...

Let us, then, at the time appointed, gather around their sacred remains, and garland the passionless mounds above them with choicest flowers of springtime; let us raise above them the dear old flag they saved; let us in this solemn presence renew our pledge to aid and assist those whom they have left among us a sacred charge upon the Nation's gratitude—the soldier's and sailor's widow and orphan. ~General Orders No. 11, Washington, DC, May 5, 1868

Please take the time to remember our dogs of war.
They gave so much for so little in return.


In all previous wars we brought home our highly trained military dogs to retire with their handler or to continue to serve EXCEPT for Vietnam. When our military was ordered out of Nam our dogs were tied to camp poles and left to watch the soldiers they loved and protected walk away and not look back. Those dogs were considered to be excess baggage.

What happened to those dogs? Most were starved to death, used for target practice or skinned alive and eaten by the Viet Cong who considered them to be a delicacy. Rumor has it that those who weren't tied, or confined, ran behind planes, waited patiently beneath helicopters for their orders, and then, when they were completely exhausted, went back to their last camp and held vigil, patiently, for their handler to come back. (If you would like to learn more, click on the War Dog graphic. It will take you to a very sobering site.) Out of 3,000 war dogs in Vietnam, about 200 came home.

More war dogs and additional information can be found at my dog's blog, Loving for a Living.

God bless America
God bless our troops

Saturday, May 23, 2009

♥Deep Rich Chocolate Layer Cake♥ Well worth the time & effort

Ingredients
  • 1/2 cup unsweetened cocoa powder
  • 2 cups all-purpose flour
  • 1 teaspoon baking powder
  • 1/2 teaspoon baking soda
  • 2/3 cup butter, softened
  • 1-3/4 cups sugar
  • 3 eggs
  • 4 ounces unsweetened chocolate, melted and cooled
  • 2 teaspoons vanilla
  • 1-1/2 cups milk
  • 12 ounces semisweet chocolate pieces (2 cups)
  • 1/2 cup butter
  • 8 ounces dairy sour cream
  • 4-1/2 cups sifted powdered sugar (about 1 pound)
  • Chocolate curls (optional)
  • Chocolate-Sour Cream Frosting (see below)

Directions

1. Grease three 9-inch round baking pans, three 8X8X2-inch square baking pans; lightly dust each pan with 1 teaspoon of the cocoa powder. In a medium bowl, stir together the remaining cocoa powder, flour, baking powder, and baking soda. Set aside.

2. Preheat oven to 350 degrees F. In a large bowl, beat the butter with an electric mixer on medium to high speed for 30 seconds. Add sugar; beat until combined. Add eggs, one at a time, beating for 30 seconds after each addition.

3. Beat in chocolate and vanilla. Alternately add flour mixture and milk to chocolate mixture, beating on low speed until well mixed. (Batter will be thick.)

4. Divide batter among prepared pans; spread evenly. Bake in the preheated oven for 20 to 25 minutes or until a toothpick inserted near the centers comes out clean. Cool in pans on wire racks for 10 minutes. Remove from pans. Cool completely on wire racks.

5. Make chocolate curls, if using. Arrange curls in an even layer on a waxed paper-lined tray and set aside in a cool, dry place. To assemble cake, spread Chocolate-Sour Cream Frosting on tops of two of the layers; stack. Add top layer; frost the top and sides of the cake. If desired, while frosting is still moist, use a 4- to 6-inch wooden skewer or tweezers to lightly press chocolate curls into frosting around the bottom two-thirds of the cake. If desired, garnish top with either broken peppermint patties or chocolate malt balls. Store, covered, in the refrigerator. Makes 12 to 16 servings.

Frosting: In a large saucepan melt chocolate and butter over low heat, stirring frequently. Cool for 5 minutes. Stir in sour cream. Gradually add powdered sugar, beating until smooth. This frosts tops and sides of two 8- or 9-inch cake layers.

Wednesday, May 20, 2009

♥Chocolate Chip Cookie Pie♥ You know you want a piece, don't you?

Over at Our Family Attic I have a Chocolate Pie in a Jar recipe that is absolutely scrumptious! I must be in a chocolate mood today because I couldn't resist offering this gem on my foodie blog. Or, could it be that I spent the morning looking at rich, brown dirt while I was weeding my garden? I don't know the answer for sure but I do know that if you love chocolate, both of my offerings today are fabulous!

This one is rich, so a cup of coffee, tea or milk is in order when you sit down to gobble this up after dinner or as a little treat for yourself in the evening.
  • 1 unbaked 9-inch (4-cup volume) deep-dish pie shell
  • 2 large eggs
  • 1/2 cup all-purpose flour
  • 1/2 cup granulated sugar
  • 1/2 cup packed brown sugar
  • 3/4 cup (1 1/2 sticks) butter, softened
  • 1 cup (6 ounces) semi-sweet chocolate morsels
  • 1 cup chopped pecans
  • Serve with ice cream (optional)
  • * If using frozen pie shell, use deep dish style and thaw completely. Bake on baking sheet and increase baking time slightly.
Directions
  1. Preheat oven 325 degrees F.
  2. Beat eggs in large mixer bowl on high until foamy.
  3. Beat in flour, granulated sugar and brown sugar. Beat in butter.
  4. Stir in morsels and nuts and spoon into pie shell.
  5. Bake for 55-60 minutes. Cool on wire rack. Serve warm.

Orange Ricotta Pound Cake with Fresh Strawberries

Ingredients
  • 1 1/2 cups cake flour
  • 2 1/2 teaspoons baking powder
  • 1 teaspoon kosher salt
  • 3/4 cup (1 1/2 sticks) butter, room temperature, plus more to grease the baking pan
  • 1 1/2 cups whole milk ricotta cheese
  • 1 1/2 cups sugar, plus 1 tablespoon
  • 3 large eggs
  • 1 teaspoon vanilla extract
  • 1 orange, zested
  • 2 tablespoons Amaretto
  • Powdered sugar, for dusting
  • 1 pint strawberries, hulled and quartered or 3 oranges, cut into supremes

Directions

Preheat the oven to 350 degrees F. Grease a 9 by 5 by 3-inch loaf pan with butter. In a medium bowl combine the flour, baking powder, and salt. Stir to combine.

Using an electric mixer, cream together the butter, ricotta, and sugar until light and fluffy, about 3 minutes. With the machine running, add the eggs 1 at a time. Add the vanilla, orange zest, and Amaretto until combined. Add the dry ingredients, a small amount at a time, until just incorporated. Pour the mixture into the prepared pan and bake until a toothpick comes out clean and the cake is beginning to pull away from the sides of the pan, about 45 to 50 minutes. Let the cake cool in the pan for 10 minutes then transfer to a wire rack to cool completely. Using a mesh sieve, dust the cooled cake with powdered sugar.

Meanwhile, place the strawberries (or orange supremes) in a small bowl with the remaining 1 tablespoon sugar. Let sit until the juices have pooled around the strawberries.

To serve, slice the cake and serve with a spoonful of strawberries and their juices over the top of the cake.

Sunday, May 17, 2009

STRAWBERRY CREAM CHEESE BREAD, easy, moist, a delicate spring treat


It's spring, and if it is, it's time to make Strawberry Bread. Sure you can buy the berries in the wintertime, but this bread just doesn't taste the same as it does when fresh, sweet, juicy berries are used. I l♥
ve to spread strawberry or raspberry cream cheese on it when it's warm and have a cup of tea on the side. Oh, yum!

Ingredients:
1/2 cup unsalted butter
3/4 cup granulated white sugar
3 large eggs
1 teaspoon vanilla extract
2 cups all-purpose flour
1/2 teaspoon baking powder
1/2 teaspoon baking soda
1/4 teaspoon salt
1 teaspoon ground cinnamon
1/2 cup sour cream
1/2 cup toasted pecans (coarsely chopped)
2 cups strawberries (fresh or frozen)


Directions:
1. Cream the butter and sugar in a bowl.
2. Beat in the eggs one at a time.
3. Beat in the vanilla.
4. Mix the flour, baking powder, baking soda, salt and cinnamon in another bowl.
5. Mix 1/3 of the dry ingredients into the wet.
6. Mix 1/2 of the sour cream into the wet ingredients.
7. Mix 1/3 of the dry ingredients into the wet.
8. Mix the remaining sour cream into the wet ingredients.
9. Mix the remaining dry ingredients into the wet.
10. Mix in the strawberries.
11. Pour the batter into a greased 9x5 inch loaf pan.
12. Bake in a preheated 350F oven until golden brown and a toothpick poked into the center comes out clean, about 60 minutes.

Saturday, May 16, 2009

Bored? Raining outside? Want to smile? Whip up some chocolate mice!

Little, chocolate mice
  • 4 (1 ounce) squares semisweet chocolate
  • 1/3 cup vanilla yogurt
  • 1 cup chocolate cookie crumbs (Oreos work great)
What you will need to bring the little guys to life
  • 1/3 cup chocolate cookie crumbs (to roll your mice in for their fur)
  • 1/3 cup confectioners' sugar (for white mice)
  • 24 silver dragees decorating candy (for the little eyes)
  • 1/4 cup sliced almonds (for the ears)
  • 12 (2 inch) pieces long red vine licorice (for their tails)
  • cinnamon candies for their noses. I like to save some from Valentine's Day to make tiny, heart noses
  1. Melt the chocolate, and combine with vanilla yogurt. Stir in 1 cup chocolate cookie crumbs. Cover and refrigerate until firm. I like to keep most of the dough in the fridge and just a little on my work surface as I make these guys. Once the dough gets too warm it's a bit messy.
  2. Roll by level tablespoonfuls into balls. Mold to a slight point at one end (the nose).
  3. Roll dough in confectioners sugar (for white mice), and in chocolate cookie crumbs (for dark mice). On each mouse, place dragees in appropriate spot for eyes, almond slices for ears, and a licorice string for the tail.
  4. Refrigerate for at least two hours, until firm.
If you don't have the yogurt handy, you can use peanut butter for an especially yummy variation. Once you have the basic dough made, use your imagination!

For presentation, you can line a shoe box with foil for a little house. I've placed my mice in toasted coconut (shown). You can also sprinkle chocolate jimmies here and there to make it look like they've been in their box for a while.

Friday, May 15, 2009

Strawberry-Yogurt Sm♥♥thie P♥ps YUM! YUM!


Photo courtesy of Woman's Day Magazine

Ingredients

    1 lb strawberries, hulled
    1⁄3 cup plus 1⁄4 cup sugar, preferably superfine
    2 tsp lemon juice
    2 cups vanilla yogurt

    You’ll also need:
    2 large plastic squeeze bottles,
    10 pop molds (1⁄2-cup capacity)

1. Place strawberries, 1⁄3 cup sugar and lemon juice in blender; purée 3 minutes. Pour into a large plastic squeeze bottle and screw on bottle top.

2. In a medium bowl, stir remaining 1⁄4 cup sugar into yogurt until sugar is dissolved. Pour into the second squeeze bottle and screw on bottle top.

3. Fill each pop mold with strawberry and yogurt mixtures, alternately squeezing or spooning the mixtures into each mold to create a swirled pattern. Place tops on molds; insert wooden sticks. Freeze at least 6 hours until solidly frozen.

4. Remove molds from freezer. Soften slightly at room temperature, about 5 minutes (or dip molds in warm water a few seconds). Remove pops from molds. Serve immediately, or wrap pops separately in plastic wrap, then store in freezer bag or container.

Tip: Large squeeze bottles (2-cup capacity) are available in crafts stores and baking supply stores, sometimes labeled for candy-making. To easily unmold the pops, use a pair of pliers to grip the sticks and gently pull out pops.

These are really, really GOOD and HEALTHY and LOW CALORIE and YUMMY! Who cares if you're watching your weight...or not...lick for lick and slurp for slurp, these are winners hands down! My kids are always telling me to feed the grandchildren healthy. Well, now I can make the parents happy and the kids happy and me happy because I ♥ to putter in the kitchen!

Thursday, May 14, 2009

Chocolate dipped crazy pretzel sticks...you're gonna ♥ these like crazy!

Chocolate dipped crazy pretzel sticks...
you're gonna ♥ these like crazy!


Dip, dunk, drizzle and sprinkle as you please. Fantastically easy and fun to make, these delicious sweetly salty snacks will have your family comin' back for more. Great to make any day of the year. Easy-peasy for the grandkids. A great, little goodie to make with little hands to take home to mommy and daddy.

Ingredients:

  • 1 cup (6 oz.) NESTLÉ® TOLL HOUSE® Semi-Sweet Chocolate, Milk Chocolate or Premier White Morsels
  • 1 tablespoon vegetable shortening
  • 16 pretzel rods
  • NESTLÉ® TOLL HOUSE® Semi-Sweet Chocolate Mini Morsels and/or sprinkles, (optional)
  • Additional NESTLÉ® TOLL HOUSE® Morsels for drizzling, (optional)
Directions:

LINE baking sheet with wax paper.

MICROWAVE 1 cup morsels and vegetable shortening in small, dry, uncovered, microwave-safe bowl on MEDIUM-HIGH (70%) power for 1 minute; STIR. The morsels may retain some of their original shape. If necessary, microwave at additional 10- to 15-second intervals, stirring just until morsels are melted.

DIP pretzel rods about 3 inches into melted morsels, tilting bowl to easily dip. Use side of bowl to remove excess. Sprinkle with morsels or sprinkles. Place on prepared baking sheet. Refrigerate for 20 minutes or until set. Store in airtight container at room temperature. Best when eaten within a few days.

FOR A FANCY DRIZZLE:

MICROWAVE 2 tablespoons of each desired morsel flavor in small, heavy-duty plastic bags on MEDIUM-HIGH (70%) power for 30 seconds; knead. Microwave at additional 10- to 15-second intervals, kneading until smooth. Cut tiny corner from each bag; squeeze to drizzle over already dipped pretzels on baking sheet. Refrigerate and store as directed above.

TIPS:

• Pretzels may be dipped and drizzled in any variety of melted morsels for different looks. For example, dip them in semi-sweet chocolate and drizzle them with melted white morsels. Or dip them in milk chocolate and drizzle them with melted semi-sweet chocolate.
• Above recipe can easily be doubled, but it's not good to be microwaving more than 2 cups (12 ounces) of chips at one time.


Saturday, May 9, 2009

I ♥ Reese's Peanut Butter Cups. I ♥ this recipe!

It's not often that I see a recipe, got out and buy the ingredients and make it pronto! Well, this one I did. Why, because it's quick and easy and sounded SO good! I can tell you first hand...IT IS all that and a bag of chips! This is going to become one of my "stand-bys" because it is fun, looks like you spent hours in the kitchen, and tastes...well, you know what a peanut butter cup tastes like, so just imagine it nestled into a fillo cup and topped with additional nuts! Oh, YUM!

Fillo Peanut Butter Cups

Photo courtesy of Woman's Day Magazine

INGREDIENTS

    1 box (1.9 oz) mini– fillo shells (15 in box)
    15 miniature peanut butter cups (from a 12-oz bag)
    1 can (7 oz) whipped light cream

PREPARATION

1. Heat oven to 350ºF. Line a rimmed baking sheetwith foil. Place fillo shells on baking sheet.

2. Place a peanut butter cup in each shell. Bake 5 minutes until chocolate softens. With small metal spatula or knife, flatten and even out chocolate in fillo cup. Let stand at room temperature until cooled.

3. Top each filled cup with whipped cream. Sprinkle with chopped salted peanuts, if desired.

Each of these is 97 calories. A manageable number☺

Memories, meals and my m♥ther...

Ever since I spied my first blog. Ever since I started to blog. Ever since I realized that I needed a place for all of my recipes and links, I've wanted to have a "foodie" blog. Once that decision was made I needed to name it. The name would have to have meaning to me. The name would have to bring back the memories I keep close and safe in my heart of my mother in her kitchen and the wonderful meals she would prepare for friends and family.

I'm a firm believer that sometimes you are led by a power unknown to places you need to be. So, with that in mind, I began the search for the name of this blog. I tried this and I tried that and then I tried another angle. All of my initial attempts were stopped dead in their tracks because the name had already been used by someone else. Bummer, I thought.

So, I leaned back in my kitchen chair, closed my eyes and mulled over the words that slid into my head and the dear memories that floated in and out of my soul. I saw myself walking home from school wondering what mom was going to put on the kitchen table for dinner that night. As I saw myself walking up the driveway, I clearly recalled that as sure as the sun shines in the sky, as soon as you opened the back door that led to the kitchen...you knew. The aroma of good food would be there day after day. And, there would be my mother, standing at the kitchen sink peeling a potato or tossing a salad wearing a little apron...a kitchen towel slung over her shoulder like an expensive shawl.

That was it...the deed was done. I would name my recipe and food blog, Standing at the Kitchen Door. Those words brought back to me not only the comfort of my youth but the memory of the wonderful meals created by my mother's hands.